1. Use folders to reduce Inbox clutter
It seems easy to let emails just pile up in your Inbox, until you try to find something and have to suffer through a manual search. Instead, move messages to a custom folder that relates to the company or the message. It’s just like using a file cabinet.
Custom folders are easy to create, manage, and search; and there are no limits to size or count except disk space or limitations imposed by your system administrator. But don’t go crazy! Too many folders can also slow Outlook's responses. You wouldn’t create a folder in a file cabinet for just a dozen documents. If you’re creating one folder for each client or each company, or even by subject/content (such as taxes, receipts, travel), it’s ok to consolidate the infrequent communications into a Misc folder.
Here's how to get started with custom folders.
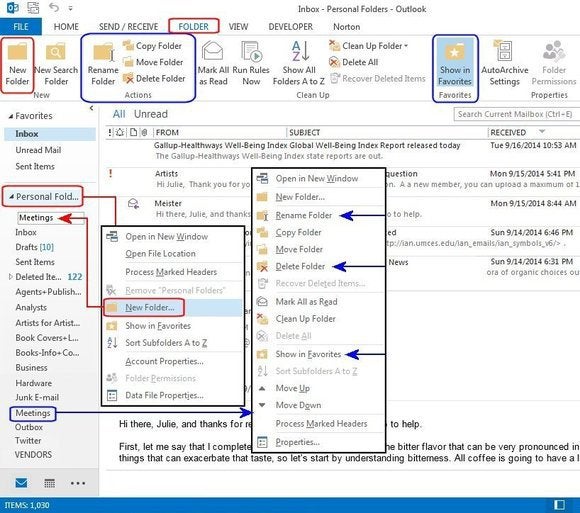
1. Right-click on the Personal Folders option in Outlook's left-hand navigational pane, then choose New Folder from the dropdown list. (Alternatively open the Folder tab and click the New Folder button from the "New" group.)
2. In the Field box, type the folder name (e.g., Meetings) and press Enter. If you change your mind or notice a typo, right-click the new folder and select Rename Folder or Delete Folder. You can also Move it, Copy it, or add it to the Favorites section via the right-click menu. You can also select any one of these buttons from the Actions group.
3. Notice all the other Folder options on the Ribbon menu. You can Search, Sort, Archive, Apply
Categories help organize the emails in your active Inbox so you can quickly determine the status of each email; for example: Pending, Due, Done, etc. You can also sort by categories. So, for example, if you only perform email maintenance once a week, you can sort by category, quickly locate all the "Done" emails, and then move them to their corresponding folders.
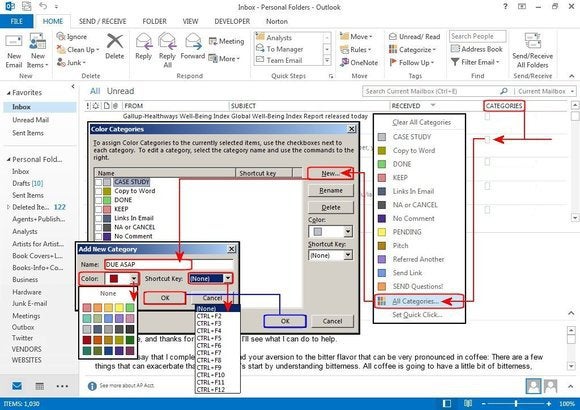
1. To create a new category, right-click on the transparent square box in the Categories column, and select "All Categories" from the dropdown list. In the Color Categories dialog box, click the New button. Enter a Name for your category in the "Add New Category dialog box.
2. Click the down-arrow beside the Color field and choose a color for the category. Next, click the down-arrow beside the Shortcut Key field and choose a shortcut key (CTRL+F2 thru CTRL+F12) for the category. These keys are not used by other functions in Outlook, so they are available for category shortcuts.
3. Click OK in this dialog, then click OK again in the Color Categories dialog box and the new category is added to your list. Note: there are 25 colors, but only 11 shortcut keys, so choose the most frequently used categories for your shortcut keys.
4. To attach a category to an email, select the email, then right-click anywhere in the Categories column, and select a category from the dropdown list. Note: emails can have more than one category. To remove a category, right-click anywhere in the Categories column on the selected email, and click Clear All Categories from the dropdown list. This will only clear all the categories attached to the selected email. It will not affect your other emails.
2. Create and assign categories
Categories help organize the emails in your active Inbox so you can quickly determine the status of each email; for example: Pending, Due, Done, etc. You can also sort by categories. So, for example, if you only perform email maintenance once a week, you can sort by category, quickly locate all the "Done" emails, and then move them to their corresponding folders.
1. To create a new category, right-click on the transparent square box in the Categories column, and select "All Categories" from the dropdown list. In the Color Categories dialog box, click the New button. Enter a Name for your category in the "Add New Category dialog box.
2. Click the down-arrow beside the Color field and choose a color for the category. Next, click the down-arrow beside the Shortcut Key field and choose a shortcut key (CTRL+F2 thru CTRL+F12) for the category. These keys are not used by other functions in Outlook, so they are available for category shortcuts.
3. Click OK in this dialog, then click OK again in the Color Categories dialog box and the new category is added to your list. Note: there are 25 colors, but only 11 shortcut keys, so choose the most frequently used categories for your shortcut keys.
4. To attach a category to an email, select the email, then right-click anywhere in the Categories column, and select a category from the dropdown list. Note: emails can have more than one category. To remove a category, right-click anywhere in the Categories column on the selected email, and click Clear All Categories from the dropdown list. This will only clear all the categories attached to the selected email. It will not affect your other emails.
Rules, Mark all Emails as Read, Clean Up, etc.—everything you need to manage your folders.
Nhận xét
Đăng nhận xét